上一篇小沃给大家讲解了一下java + eclipse + opencv环境搭建的方法,这一篇小沃给大家讲讲如何通过java + opencv实现人脸检测。
如果关于搭建最简单的opencv工程还有什么不明白的,请直接去看上一篇文章。
下面,小沃就来讲讲如何实现java下的人脸检测。
一、导入过滤器文件
这里我们所使用的过滤器是在源代码中的build -> etc -> lbpcascades -> lbpcascade_frontalface.xml文件。
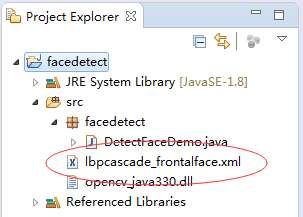
首先我们将它拖到工程目录的src文件夹中去。

二、获取相关资料
1.获取过滤器
CascadeClassifier faceDetector = new CascadeClassifier(getClass().getResource("/lbpcascade_frontalface.xml").getPath().substring(1));
2.获取需要处理的图片
Mat image = Imgcodecs.imread(filepath);//filepath是需要处理的图片的绝对路径
三、使用过滤器处理图片,并且将图片存到MatOfRect对象中去
MatOfRect faceDetections = new MatOfRect();
faceDetector.detectMultiScale(image, faceDetections);
四、解析得到的结果
System.out.println(String.format("Detected %s faces", faceDetections.toArray().length));//打印当前图片有几张脸
for (Rect rect : faceDetections.toArray()) {//分离出人脸的相关信息
Imgproc.rectangle(image, new Point(rect.x, rect.y), new Point(rect.x + rect.width, rect.y + rect.height), new Scalar(0, 255, 0));//给原画的人脸部分画上方框
}
//将新的图片本地保存
String filename = "faceDetection.png";
System.out.println(String.format("Writing %s", filename));
Imgcodecs.imwrite(filename, image);
这样就能找到人脸了。
下面贡献一段代码,注:如果想运行这段代码,需要将图片lena.png放到src下。
Main.java
package facedetect;

import org.opencv.core.Core;

public class Main {

	public static void main(String[] args) {
		// TODO Auto-generated method stub
		System.loadLibrary(Core.NATIVE_LIBRARY_NAME);
		DetectFaceDemo detectfacedemo = new DetectFaceDemo();
		detectfacedemo.run();
	}

}
DetectFaceDemo.java
package facedetect;

import org.opencv.core.Mat;
import org.opencv.core.MatOfRect;
import org.opencv.core.Point;
import org.opencv.core.Rect;
import org.opencv.core.Scalar;
import org.opencv.imgcodecs.Imgcodecs;
import org.opencv.imgproc.Imgproc;
import org.opencv.objdetect.CascadeClassifier;

public class DetectFaceDemo {
	  public void run() {
		    System.out.println("\nRunning DetectFaceDemo");

		    // Create a face detector from the cascade file in the resources
		    // directory.
		    String xmlpath = getClass().getResource("/lbpcascade_frontalface.xml").getPath().substring(1);
		    System.out.println(xmlpath);
		    CascadeClassifier faceDetector = new CascadeClassifier(xmlpath);
		    String srcImagepath = getClass().getResource("/lena.png").getPath().substring(1);
		    System.out.println(srcImagepath);
		    Mat image = Imgcodecs.imread(srcImagepath);

		    // Detect faces in the image.
		    // MatOfRect is a special container class for Rect.
		    MatOfRect faceDetections = new MatOfRect();
		    faceDetector.detectMultiScale(image, faceDetections);

		    System.out.println(String.format("Detected %s faces", faceDetections.toArray().length));

		    // Draw a bounding box around each face.
		    for (Rect rect : faceDetections.toArray()) {
		    	Imgproc.rectangle(image, new Point(rect.x, rect.y), new Point(rect.x + rect.width, rect.y + rect.height), new Scalar(0, 255, 0));
		    }

		    // Save the visualized detection.
		    String filename = "faceDetection.png";
		    System.out.println(String.format("Writing %s", filename));
		    Imgcodecs.imwrite(filename, image);
		  }
}
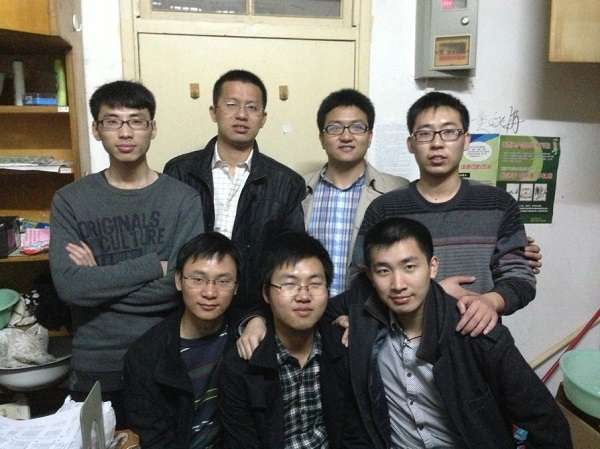
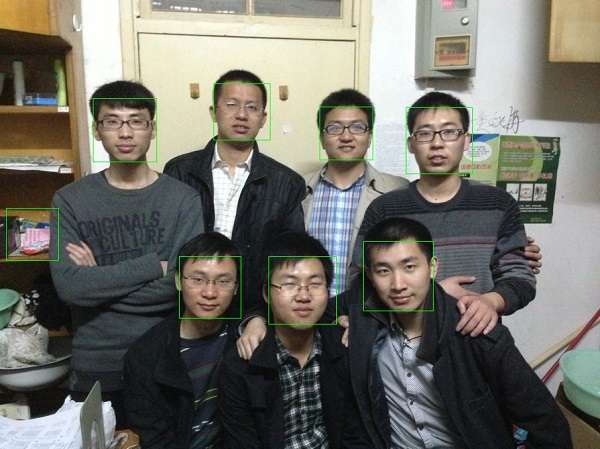
运行效果如下图:

运行前

运行后